Wednesday, January 26, 2011

The Story of Vino Blah Blah Blah

I am very excited to be hosting a craft night/ Mommy play date tomorrow night. I'm SO excited, I'm breaking out one of my favorite spirits for the occasion. In my house it is affectionately referred to as Vino Blah Blah Blah and I can't wait to share a bottle with these lovely ladies. But as always happens when I say, "Oh! I got a bottle of Vino Blah Blah Blah!" People give me that look that clearly states they think I'm a bit wacko.

So, here is the story of Vino Blah Blah Blah.

In the Spring of 2007, the amazing man you see pictured here and I got married. We saved our pennies, paid cash for the wedding and made our dream honeymoon to Italy come true. It was perfect.

One night in Florence we were sitting in a crowded restaurant witnessing an exceptionally rude American man snap his fingers and demand bread and olive oil from the very busy waitress. (Side note: Bread and Olive Oil are served as starters in most every American Italian restaurant but we did not encounter this even one time anywhere in Italy.) But I digress. The dude was flat out rude. A bad stereotype. When the waitress came to our table I made a point to apologize for the guy and told her we weren't all like that. We then tried to make friends.

By the end of dinner we had told her we were on our honeymoon and she was kind enough to present us with a little gift- two champaign flutes filled with bubbly pink goodness. OH MY but it was delicious! Sweet, but not in a bad wine sort of way.  It had notes of raspberries and peaches and just the right amount of fizz. It was lovely. I wanted to bring home a case of it. We asked our new friend what it was. She told us. Twice. In Italian.  My Italian consists of "Aqua Minerale Naturale Par favore" (Still mineral water, please).  So, yeah. We didn't understand. We heard, "Vino Blah Blah Blah Blah Blah". And so thought we were doomed never to know the mythical pink libation.

Fast forward one year.  Our first wedding anniversary. The hubs, he loves to eat; and let's be honest, so do I. We'd heard of a place in Kansas City called Blue Stem that had a tasting menu with wine pairings and thought it would be perfect for our celebration. And it was. It was lovely. We had a wonderful dinner and then dessert arrived. Deconstructed Carrot Cake for me; something mint chocolate for Mikey. The Sommelier came by with our paired drinks. Mike got a mint julep. Then he started describing mine. Pink, sparkling- our eyes got wide, raspberries- wider still, peaches- Could it be?! He poured. We exclaimed, "Vino Blah Blah Blah!!" How serendipitous that it was our first anniversary AND we spoke the same language! We asked him to write it down for us.

Vino Blah Blah Blah = Brachetto D'Aqui
And this one is available at Sam's Club! 

So there you are. The romantic story of Vino Blah Blah Blah. I hope you'll try a bottle and share it with someone you love. 

Tuesday, January 25, 2011

Come Together Baby Blanket Pattern Now Available!


I'm very happy to announce that the pattern for the Come Together Baby Blanket is now available and Jam Packed with bonuses!


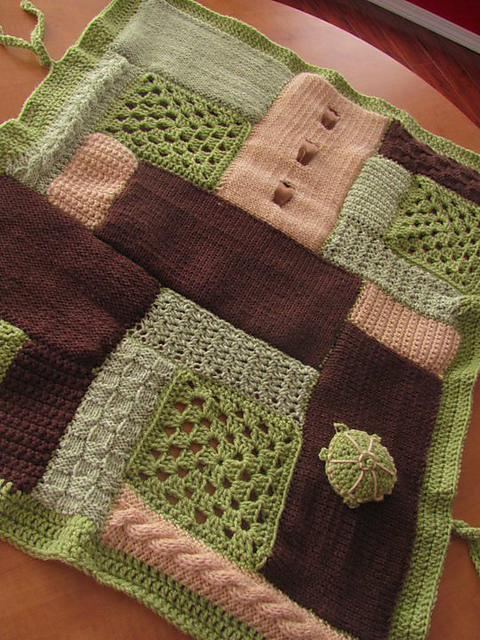
Who says Knitters don’t Crochet and Crocheters don’t knit!? In this blanket knit and crochet blocks Come Together to make a charming and interesting blanket with multiple textures. It also features satin ribbon details, sweet embellishments and convenient 6” ties for attaching to a stroller or infant carrier making it the perfect blanket for baby and Mommy. Finished size 28.5 x 35.5 inches.

As a bonus this pattern includes a miniature size version perfect for dolls or loveys. Make several and keep one in the car and one at Grandma’s house and the child will always have his/her favorite blankie close at hand. Finished size 12x11 inches.

Pattern features: written instructions, photos of each block, graphic layout map, instructions for both hand and Machine Knitting are given for larger blocks, instructions and photos for miniature version, three embellishment options (turtle, owl and cupcake), and additional color ideas.

Although the blanket appears complicated, it is actually quite simple to make. Both Knit and Crochet stitches are kept basic so those who dabble in one or the other can easily complete this project. Perfect for those trying to decide which art they prefer or those just starting out.


Knit Stitches Used: Knit, Purl, K2tog, Yarn Over

Crochet Stitches Used: Single Crochet, Double Crochet, Half Double Crochet, Chain

Yarn Needed: Approximately 340 yards of each of 4 different colors worsted weight yarn.

Sunday, January 23, 2011

Turkey Loop Stitch Explanation

I've had a few people asking me, "What in the world is Turkey Loop Stitch?"  I think it goes by several different names including Turkey stitch and Loop stitch. It is an embroidery stitch that creates secured loops. Here is how I do it.  You'll need a needle and thread, or a tapestry needle and a length of yarn.


Bring your needle UP at A.  Use a Knitting Needle to make your loop size and keep it uniform throughout.  Go DOWN at B leaving a loop.  Bring your needle back UP at C and go DOWN (without making a loop this time) at D.  Now bring your needle back UP at B and begin the process again.

I used Turkey Loop Stitch in my pattern for the Quick and Easy Mohawk Hat available for sale here: http://www.ravelry.com/patterns/library/quick--easy-no-felt-mohawk-hat

Hope that helps!

Friday, January 21, 2011

Anatomy of a Blanket Design: Progress Update 2

 Finished!!  I'm so excited to show you the finished project.  I'm calling it the "Come Together" Baby Blanket because Knit and Crochet blocks "come together" to create this one of a kind blanket that is both fun and functional.   The finished size is 28.5 x 35.5 inches.  In addition to all the different textures and colors it has a few special features.  The satin ribbon in the top center is sure to be a hit with the baby. And not to worry; although it looks like a long piece of ribbon woven through the holes, it is actually 3 separate pieces. Each piece is only 6" long and between the knit layers the ribbon is sewn and glued together as well as attached to the inside knit portion itself.  The blanket also features a fun stuffed turtle friend and 4 sets of 6" long ties for attaching the blanket to a stroller or infant carrier. That bit is for Mom.  I hate it when my daughter's blankies drag on the floor or are constantly falling down and need attention.  These little ties should mitigate that problem.  I really hope my client (and her son!!) enjoy this blanket as much as I enjoyed creating it for them.


For my knitter and crocheter friends, the written pattern is in the works and will be available to purchase through Ravelry very soon.  It will include instructions for hand making all the blocks, assembly, trim and ties. It will also include instructions for making some of the larger blocks on a knitting machine, directions for the turtle embellishment, at least one other embellishment for a girl's version, additional color ideas, and a bonus pattern for a 1/3 size "lovey" version. 

Saturday, January 15, 2011

Anatomy of a Blanket Design: Progress Update 1


Just a quick update. I'm really enjoying creating this! I decided to try cabling and am so glad I did! I've wanted to learn for a long time but didn't have the right project for it and thought it was going to be hard. But it turns out, it was very simple and I think it will be a great addition to the blanket.  Since I want the blanket to be the same on both sides I made two beige cabled strips and will sew them back to back to make one block.

I decided to give basket weave a try for another strip with the variegated green yarn.  I'm in the process of making a brown basket weave block too.

Not pictured is the second large brown knit rectangle I finished yesterday as well.  This blanket is really coming together quickly!

Here is my little road map showing my progress:

Yet to be finished are two medium sized knit rectangles in variegated green and brown (top left and bottom left), they'll be reverse stockingette or garter stitch; one brown basket weave strip (top right);  one variegated green cable strip (vertical left) and two variegated green strips that have yet to be decided. They will be placed center horizontal and top right horizontal.

I welcome your suggestions for the pattern of the undecided blocks.  Right now I'm toying with making them crochet since I've designed 4 different styles of knit blocks and only 2 styles of crochet blocks. All the blocks will all be assembled with crochet and it will have a crochet border, so it should be a fairly good mix of both though.  I've also considered making it a lacy pattern since the majority of the blocks have been fairly solid. However, the positioning will put them connected to two of the granny squares which are already pretty holey. I tried knit smocking for them, but with the variegated yarn the pattern just doesn't show up much, and it's such a narrow strip that it doesn't have a very dramatic effect.

Thursday, January 13, 2011

Anatomy of a Blanket Design

If you've checked out my little business venture, Cozy Baby, you may have notice that there are no warm and cozy blankets featured. Hats, the occasional bootee, yes. But Blankies, nope. I used to make blankies for all my friends having babies. But then I had my own and there's just no time for that. Blankies take forever. But I recently had a client request two special blankets. One was a duplicate of her son's favorite. It wasn't my pattern and not really my design aesthetic. It's perfectly lovely little blanket, soft, warm and sweet. And I know her son is going to cherish it. But I must admit to being pretty bored making it and anxious to complete it.  Of course, knowing that I was going to get to do my most favorite thing, create an brand new design, when it was finished made me even more anxious to get it done.
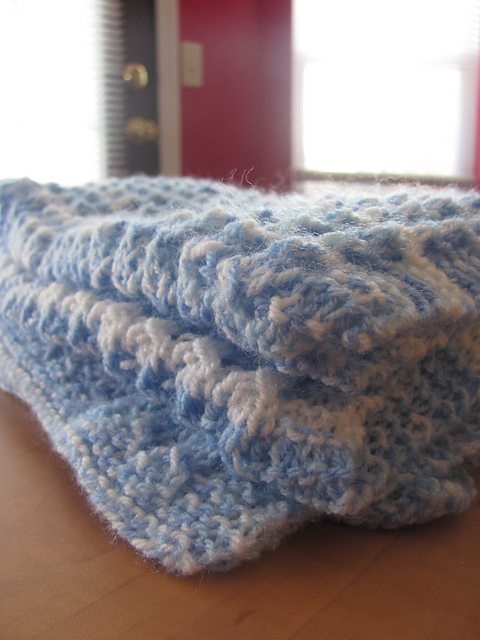
The finished blankie. 


I am so excited to finally get to work on this project. And I invite you to follow along as I create my first baby blanket design.
Here's the tentative layout. It shows the colors and shapes (you can barely tell the textured squares are the variegated yarn) but it doesn't show the texture of the stitches yet. The 3 gradient filled blocks-center top- are satin ribbon woven through the knitted block. It will also have a border of the solid green around the whole thing.

There are many great patterns out there so I want this design to be unique. For the client I want the blanket to be something cozy (of course!), interesting for the baby, sturdy, durable and functional for the mommy. For myself I want the pattern to be simple, have mass appeal and be unique enough for others to want to make.  I've settled on a patchwork design so that I'm able to finish a portion every day- short attention span theatre over here. And it will have a modern color pallet of green, brown, beige and a variegated green.  I'm using worsted weight acrylic for this project. It should get softer with each washing and hold up to many, MANY of them without losing it's shape.

I'm using a combination of knit and crochet. Here are the blocks I have completed so far:
4 green granny squares,  4 small single crochet rectangles in beige, brown and variegated green,  1 large brown knit rectangle and 1 beige knit rectangle with brown satin ribbon woven through eyelets.

This is the detail of the beige ribbon rectangle. It's knit and folds in half with wrong sides together so the blanket doesn't have a right or wrong side.  It curls now but when it's sewn together it will be flat and the ribbon is centered, although with the rolling it doesn't appear that way. 


4 Single crochet small rectangles and a close up of them.  Still need to weave some ends in. They'll lay flat when they're sewn together too.

4 green crochet granny squares. The border and stitching will also be this solid green.

Some of the pieces laid out in the layout drawn out above. 

I still have a long way to go. I haven't decided exactly what stitches to use on all the blocks yet either.  I've been wanting to give cables a try and some of the small blocks may be just the right place to work on that.  I'm writing the pattern as I work and hope to submit the finished design for a design contest as well as put the pattern up for sale on ravelry.  I welcome your comments and suggestions too!

Friday, January 7, 2011

A few quick videos

No time for a real update right now. I know, I'm behind on the Evie updates. She's very  nearly 20 months and I haven't even managed a 19 month update yet.  For now here are a few videos of her latest tricks and adventures.

Evie was a pro at Calling the Hogs before the Sugar Bowl. Not that it did us any good.


Her latest silly walk we've titled "Sneak Sneak Sneak".  She loves sneaking up on people and cats and the rocking horse. Then she tickles and giggles.


Finally,  we've been introducing her to the potty. Today she put her stuffed animals on the potty before deciding they all needed a bath and finally putting them back on the potty. My favorite is her response when asked if her Tiger is going pee pee or poo poo but you have to listen closely.

Wednesday, January 5, 2011

Thyroiditis

I saw an endocrinologist last week who told me I'd been taking my pills the wrong way for YEARS. Oops. Then I spoke to several others who've been on thyroid medication for a long time, one of them a medical professional, and they didn't know all the things I learned either! So, I'm posting this in the hopes that maybe I can help someone out there.  Of course, you should always talk to your doctor about your unique situation and know that I am not a medical professional just sharing my story and the things I learned from my specialist last week.

Thyroid disease is extremely common. It can either be Hypothyroid (under active thyroid gland) or Hyperthyroid (over active thyroid gland rather unfortunately named Graves Disease which I know little about).  I have hypothyroid, Hashimoto's Thyroiditis to be specific.  WebMD (linked above) gives symptoms of Hypothyroidism as: 
  • Feeling tired, weak, or depressed; 
  • Dry skin and brittle nails; 
  • Not being able to stand the cold;  
  • Constipation;  
  • Memory problems or having trouble thinking clearly; and 
  • Heavy or irregular menstrual periods.  
I have also noticed my hair falls out, I have breakouts in unusual places (like behind my ear), and weight gain or the inability to lose weight even when dieting and exercising when my levels are off. 

Additionally, in pregnancy hypothyroid can cause birth defects and mental retardation in the fetus, as well as miscarriage. Although we will never know for sure, I have a feeling my recent miscarriage at 6.5 weeks was due, at least in part, to my thyroid levels being too low.  

After pregnancy the symptoms of hypothyroid can be very similar to those experienced by most women postpartum.  That was the case with me and my dropping thyroid levels weren't caught until several months after my daughter was born. One clear sign- lack of breast milk. If your hair is falling out and you're tired and your nails are breaking AND you're not able to fully feed your infant get your thyroid checked.

If your doctor wants to test your thyroid levels he/she will draw some blood and test your TSH. It's always been a little confusing for me to understand. A high TSH number means your thyroid is LOW whereas a low TSH means your thyroid is HIGH.  I believe the normal range is -5 to 5 with the goal of being 0.  When mine was most recently checked my TSH was over 7 so my thyroid function was low. 

An under active thyroid is extremely easy to treat. Pop a teeny tiny pill in the morning and you're good. Or so I thought. Here's where my doc set me straight last week.  Most everyone I spoke with knew you had to take your thyroid replacement pill (known as Synthroid or generically as levothyroxin) first thing in the morning on an empty stomach.  I had been doing that for years. BUT I didn't know that I was supposed to take it alone and that I needed to wait a full hour before consuming anything other than water.  I had been taking my daily vitamins at the same time as my synthroid.  My endocrinologist told me that was the exact WRONG thing to do. He said the synthroid bonded with the vitamins and prevented me from absorbing the medication. So even though I'm on a relatively high dose of hormone, my body is only receiving a fraction of it. He even went so far as to say that 95% of the time if people start taking their drugs correctly their dose can be lowered over time.

So, here are the guidelines he gave me: 

1. Take synthroid or levothyroxin in the morning after fasting all night.

2. Take it with water ONLY. (No coffee for an  hour! Bummer.)

3. Do not take any other pills at the same time.

4. Continue taking vitamins but move them to 12 hours after you take the thyroid meds.

5.  No eating or drinking anything but water for at least 45 minutes and preferably an hour after taking the thyroid medication.

I found all this waiting around for coffee to be a pain. So, I had to alter my routine.  My husband leaves for work at least an hour before I typically get up for the day. So, I started keeping my pills on my nightstand. When he comes in to kiss me goodbye I roll over and take my pills. Then I go back to sleep. When I actually get up I can go straight to the coffee pot and start my day the way I want. 

The other bonus is that moving my vitamins back to dinner time has allowed me to better remember my other prescription that must be taken with food. I have traditionally been HORRIBLE about taking it but have found that I have remembered most days so far. 

I hope that sharing this has helped someone somewhere. Maybe if I can help keep someone from experiencing the pain of a lost pregnancy my little angel's short 6.5 week existence may not have been in vain.