Land of Nod sells these adorable stockings for around $30.
I made these four tonight for $23, and that includes a giant bottle of Modge Podge AND the eggnog to sip while I sit back and admire my handywork. AND I have enough material leftover to make 4 more.
Here's another shot.... Pretty close, right?!
For each (7"w X 18" l) stocking you will need 1 old stocking, some newspaper or tissue to make a pattern, 1 yard of fabric- I used muslin (1 yard will easily make 2 stockings), Craft felt or fleece (I had fleece on hand from lining hats but you just need something that doesn't fray or roll) in a variety of colors, card board or chip board, approximately 2 yards of rick rack, glue, glitter, 6" 3/8ths in grosgrain ribbon, 8" satin mini ribbon.
Step 1: Make your patterns.
Lay your old Yankee candle stained stocking on top of the newspaper and trace around it. Trace a little large to allow seam allowances. Cut it out. Mine is approximately 18" long x 7" wide at the top. Create 3 different size circles on a piece of cardboard or chip board. I pulled the back off an old notepad. My circles are 1 1/2" from a circle punch, the mouth of a shot glass and the bottom of a pilsner glass. I promise I wasn't drinking when I made these, but they're easy enough, you could be.
Step 2: Cut out your fabric.
(Keep in mind, I was making 4 stockings. If you're only making one or two you won't need the other 2 layers of fabric folded behind as shown here.)
With fabric doubled pin your pattern down and cut around it. Put your husband to work cutting out 20 felt or fleece circles using your handy patterns.
Don't let him get sharpie on the kitchen table.
I didn't, but should have, finished the top edge of the stockings at this point. Just fold the top down a 1/4", then another 1/4" and sew it down. I didn't do this and would have ended up with a seam across my dots so I just glued the top edge down later.
Step 3: Design your stocking.
Lay your circles in lines on the front side of your stocking. Pin them down before your 2 year old runs off with them. Cut rick rack to lay across the center of the circles overhanging the edges just a tad and pin down.
Set your sewing machine on a medium width zigzag stitch and sew straight down the rick rack.
Step 4: Assemble.
Pin stocking together with right sides facing and stitch.
Clip curves. Turn stocking right side out. The circles near the bottom seam tend to flip over so I glued them in place. This is where I realized I'd get a seam across my circles if I sewed the top hem down so I just glued it too.
Step 5: Hanger.
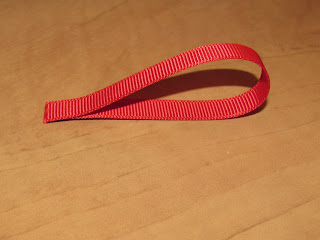
Fold a 6" piece of ribbon in half. I glued the ends together to make it easier to position. Sew to heel side seam as shown below.
Go over it a few times so it holds when Santa stuffs the stocking full of heavy things.
Step 6: Initial. You can use those fancy chip board letters to make it easier or you can DIY. I harvested the cardboard from another notepad. On the computer find a font you like. I used 250 pt Curlz and printed off the letters. Then I used modge podge to stick them to the cardboard.
I'm pretty sure plain old Elmers would work just fine. Use a scalpel to cut out the letter. Cover each letter in glue and cover with glitter. Let it dry and repeat on the other side. It'd be cute with fun scrapbook paper too. Punch a small hole in the letter and thread the piece of 8" mini ribbon through it. Tie the mini ribbon into the hanger.
Step 7: Sip Eggnog and marvel at your awesomeness. Think of what to buy with the $100 you just saved yourself.


